Cat Portrait From Photo: Capturing Feline Grace
This article delves into the process of creating a vibrant and detailed colour pencil portrait of a beautiful long-haired cat portrait from photo.
I will share insights into the materials I used, including the paper, which provided an ideal surface for the texture of the fur. I will discuss my approach on how to achieve depth, texture, and the captivating gleam in the cat’s eyes. This journey explores the unique challenges and rewards of working with colour pencils, highlighting their versatility and ability to capture the subtle nuances of fur, light, and shadow.
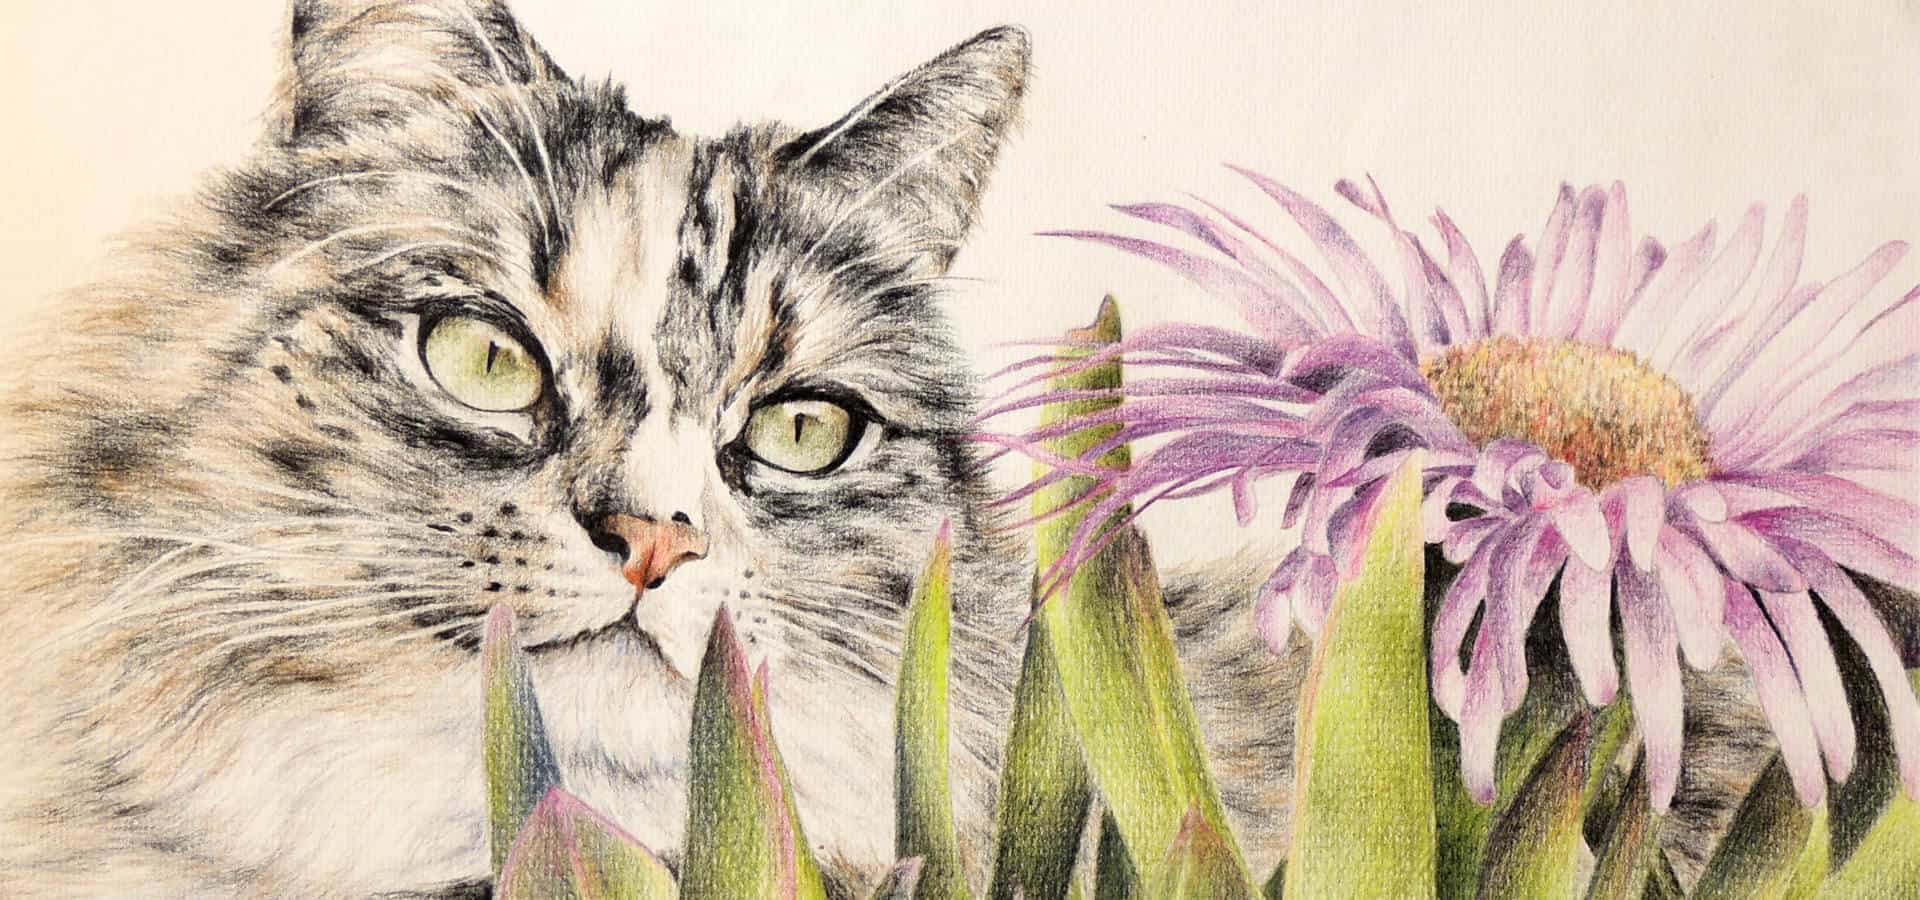
I was inspired to create this pet portrait as the cat had such beautiful eyes and the flower was a challenge I wanted to experiment with.
The succulent was an artistic challenge, too. I wanted to try to create the simplicity of the leaves against the delicate petals of the flower, as well as achieve a realistic fur texture and capture the luminosity of the cat’s eyes.
I hope you will find some inspiration and gain some insights into the process of creating a colour pencil portrait and that you will be inspired to explore this rewarding medium as a cat portrait artist.
View My Gallery: Pet Portraits Gallery
How To Draw a Cat Portrait
I must make a comment here before we start.
Materials are very important if you are wanting to create a beautiful piece of art.
Art Materials
Whether you are painting in oils, creating a watercolour, drawing with graphite pencils, or chalk and oil pastels, the better the quality – the better the result.
Investing in good-quality paints, pencils, and chalks creates lovely, clear colours that are easy to blend, and the depth and intensity of the colour add so much to your creation.
This goes for the canvases or papers that you use too.
In my opinion, it is worth paying a little more to get a better result that you can be proud of.
Cat Portrait From Photo: A Colour Pencil Portrait
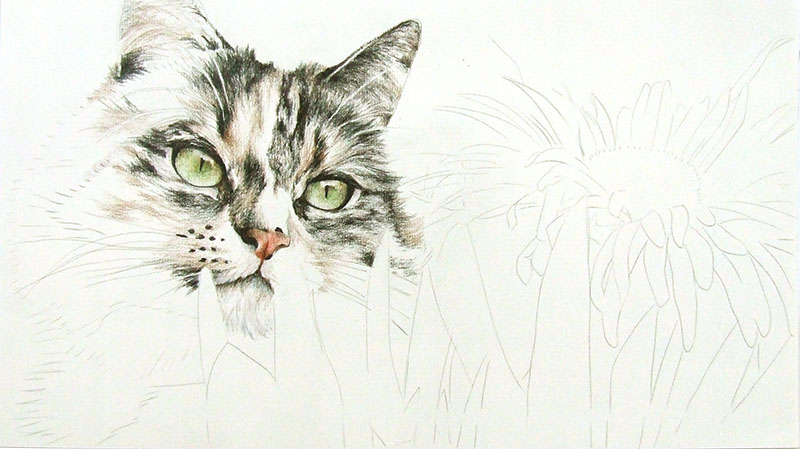
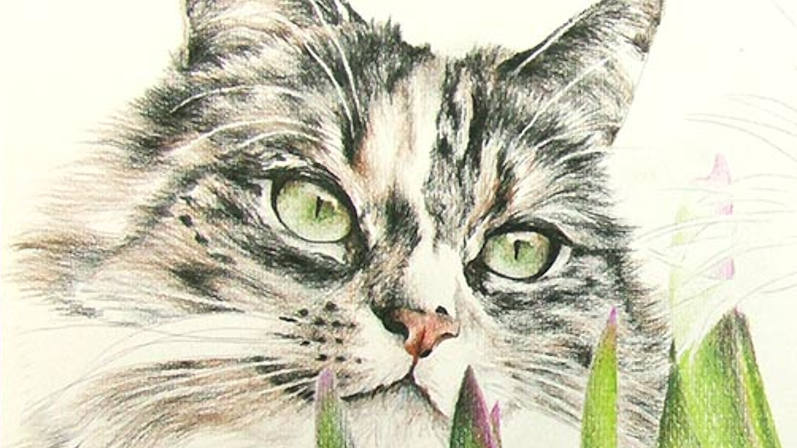
This photo appealed to me because of the beauty of both the cat and the flower.
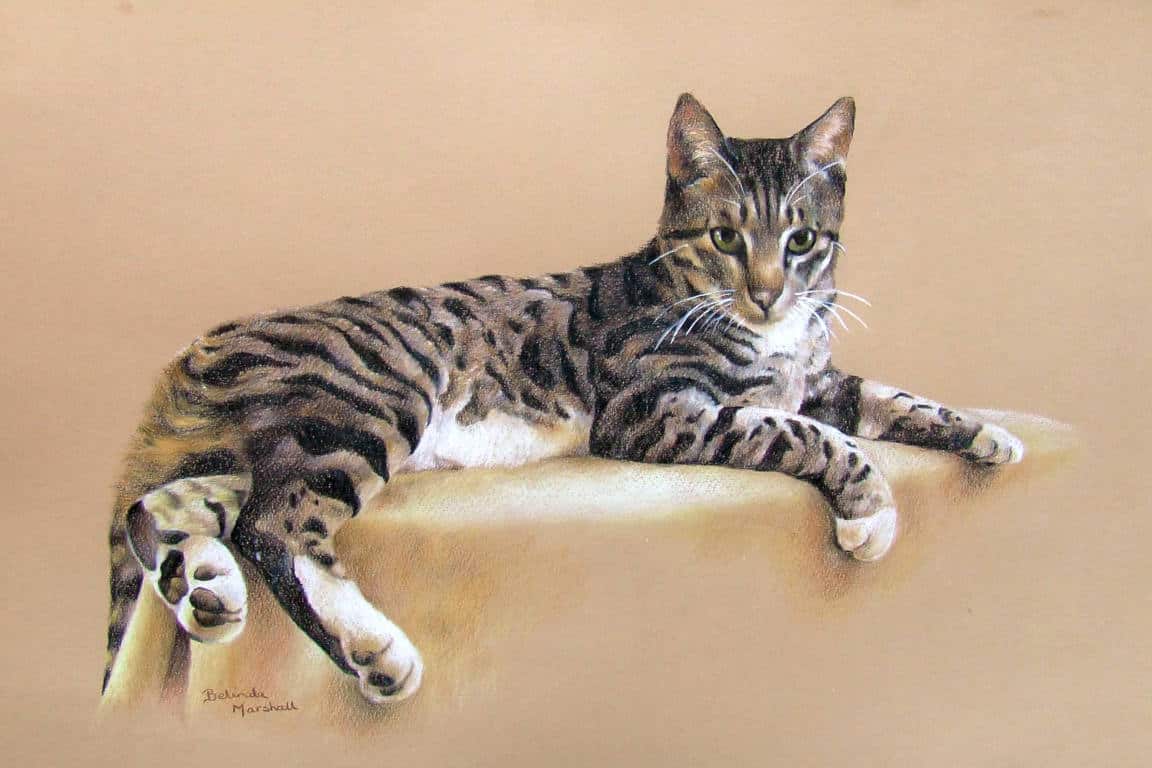
I decided to use my colour pencils on watercolour paper to create my custom cat portrait.
The reason.
I prefer drawing to painting, actually. I can stop and start at the drop of a pencil – literally – and even though I have done a lot of oil paintings – pastels and pencils are my favourite mediums.
The watercolour paper I used is nice and firm and has a fine texture that I like. I used the Winsor & Newton brand.
The colour pencils were Derwent; they are soft and provide a good selection of colours.
Read More About The Artist: About Pet Art In Pastels
Where I Start
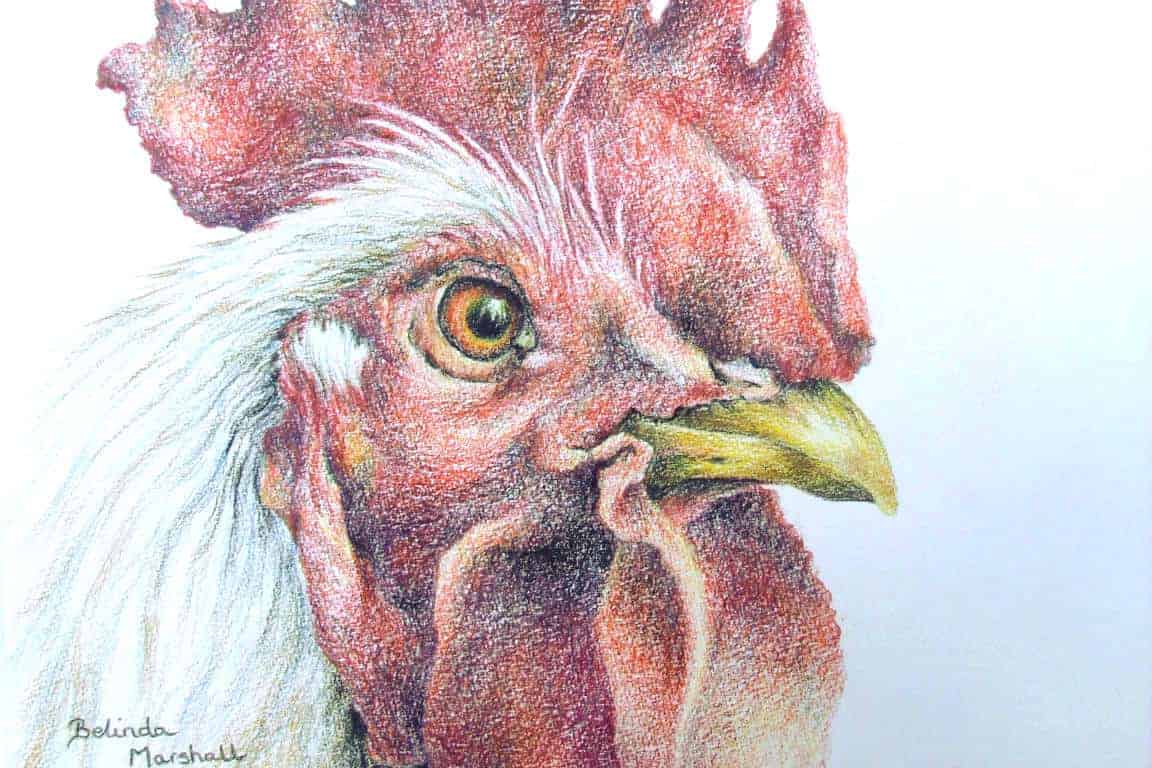
To start any drawing, the method I have developed over the years is to draw the eyes first. I feel that the eyes are the centre of any portrait, and once these are created correctly, they hold the drawing together and draw attention to the pet’s personality.
After shaping the eye with the dark outline, I then go in with colour variations, highlights, and shadows. This shapes the eye and gives luminosity and depth to the form of the eyeball. It is very important to get the pupil in the correct place. If you don’t, you may create a squint, which you definitely don’t want, or you could have either eye looking in different directions. Also not desirable.
The green colour in the cat’s eyes is reflected in the succulent’s foliage. This fact pulls the two different elements together to create a cohesive drawing that moves your eye around the drawing from the plant to the flower and back again to the cat’s face and eyes. This fact allows the viewer to appreciate the drawing as a whole.
And let’s not forget the light highlight. It is a white spot or arc shape that enhances and attracts your eye to the expression of any animal you are drawing. I think that without it, you lose something in the interpretation. Even if the photo does not provide this accent, I always insert it to add a sparkle and provide added interest.
The Face And Markings
Once I am happy with how the eyes are looking, I start working around them. Working outwards, I create the eyebrows and the cheekbones under the eyes.
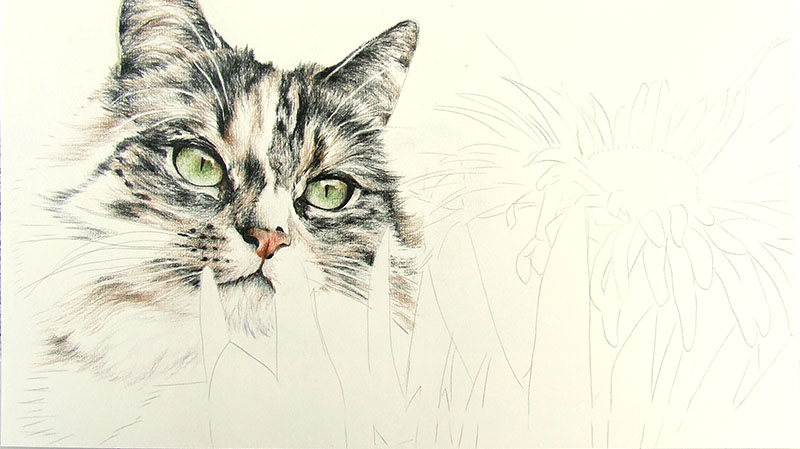
The nose is the next big project. The muzzle is the second most important feature of any animal. A cat’s nose is very delicate compared to a dog’s, but just as much a feature. From there, the mouth, chin, and cheeks are a natural progression – making sure to mark the whisker lines.
Finishing off the top of the drawing is essential in my book before moving further down the drawing. The head and ears are my next project. I find it easier to finish off the bottom of a drawing when I can see the completed top half of the animal. I can choose how much work I need to put into the rest of it and how to finish off and where to fade out the colours.
I am always careful to follow the fur directions and translate them onto the paper. These movements create the form and shape of the facial features that make the drawing so realistic. This cat is longhaired with varied colour markings. These markings make it easier to master the directional fur. I find it quite therapeutic doing the long strokes and blending the colours together.
My Achilles heel is tending to overwork areas. I am always aware of stopping earlier rather than later, especially with colour pencils and soft pastels. Sometimes it is not easy to remove colour without harming the paper or muddying the drawing and losing the clarity of the pencil strokes.
The Flower
There is nothing worse than looking at a blank area of white paper and wondering how on earth I am going to start. Especially something I am nervous about, as it is not in my comfort zone.
That is what I experienced with the succulent leaves. They are very smooth with little texture to create interest, and I was worried they would turn out like green sausages!
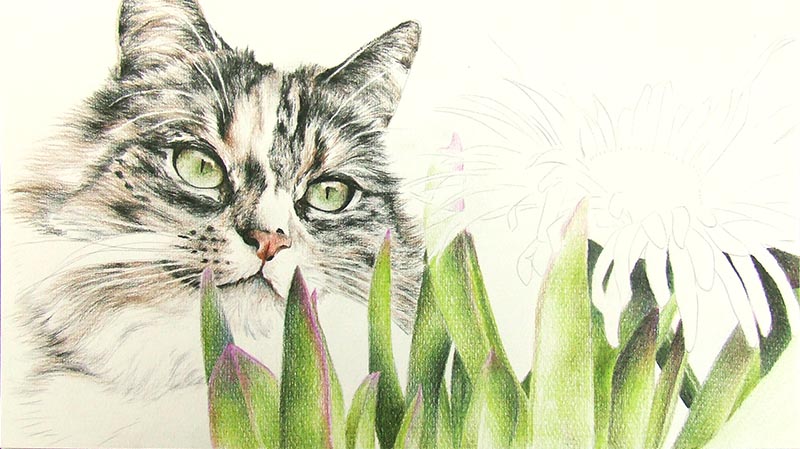
But you have to jump in, and they did not turn out too badly. I made sure that I picked up on the pink colour that was reflected in the leaves to complement the pink of the flower. I took care to get the shape and highlights right – so they did look like a succulent and not green sausage fingers.
The flower was not a problem. I trained as a textile designer, which involved lots of floral interpretations. So I was in the zone and enjoyed the drawing process of this delicate feature.
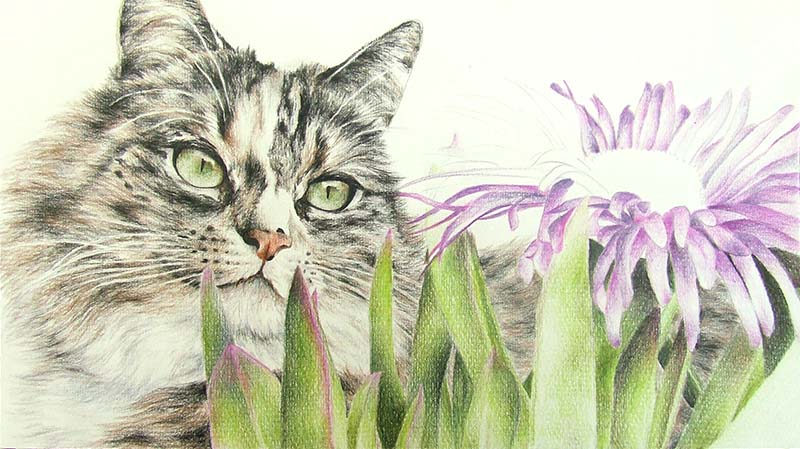
The Final Touches
Once all the elements are put on paper, now it is the finetuning stage of my cat portrait from photo.
I check that the eyes are looking and focused correctly, that they are matching shapes, and that the highlights are looking good.
I add shadows and darken areas that need more depth, making sure that the light is consistent from one direction.
Additionally, highlights are very important too. Ensure the light areas stand out too, where needed. If required, I have been known to use white acrylic to enhance highlights on a drawing that needs more impact!!
Checking the edges of the cat entails making sure the fur edges are flowing naturally.
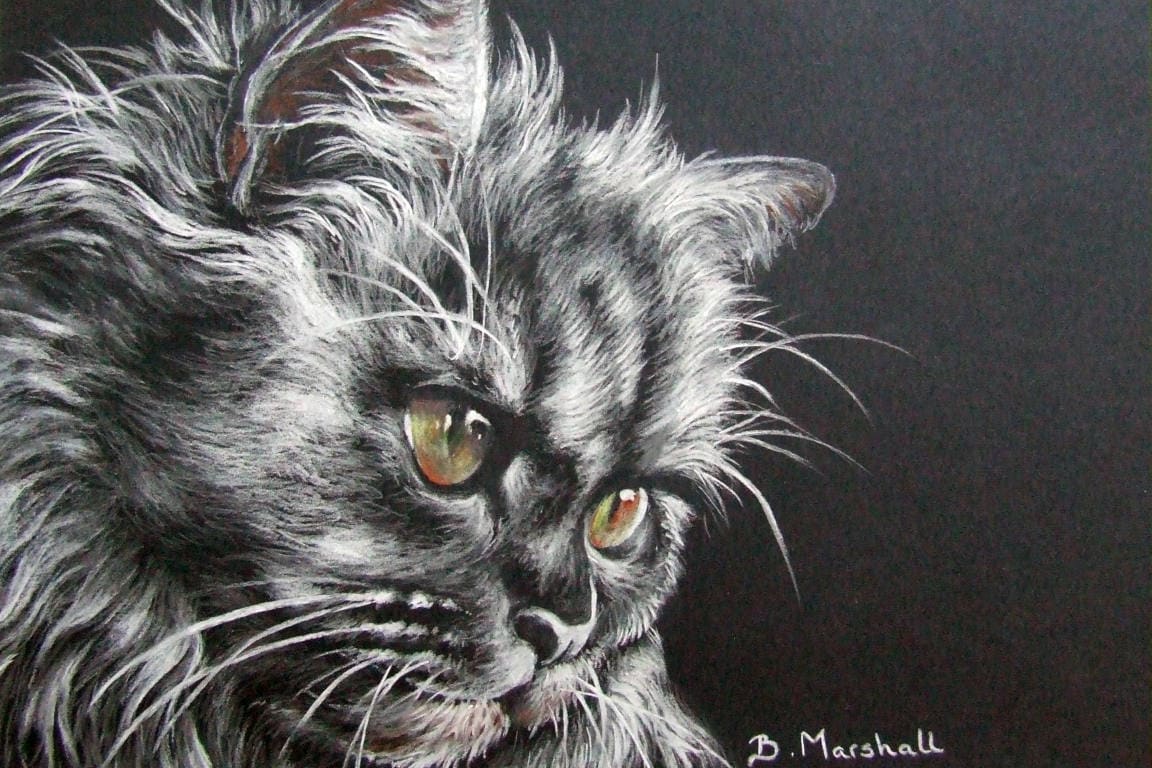
Follow how I created a pastel on black paper of a cat.
The Cat’s Whiskers
And finally, always the last tick box. The whiskers – and the eyebrow whiskers. I have nearly forgotten these on occasion, I have to admit. If the whiskers are dark I leave them till last and add them over the drawing. I am careful not to allow them to look too staged, just do nice flowing lines – once only. Do not go over or rework them – they start looking unnatural.
In this case, the whiskers were white. So they had to be planned into the initial stages of the drawing. I drew the whiskers in very lightly, and then when drawing the fur, I had to leave white space to represent them.
Afterwards, you can use a putty rubber to clean up inside the lines very carefully. Do not make them too fat, otherwise they look clunky and false. A delicate job, but well worth the effort for the finished drawing. (This is where the use of white acrylic paint on a fine paintbrush can enhance the whiskers if required.)
Woodgreens Saving Animals Lives: Support A Pet Charity
Custom Cat Portrait From Photo Conclusion
Then it was finished, and I was happy with the result. Especially that the flora looked realistic and worked well with the colouring of the cats eyes.
I hope that you enjoyed reading the process of my cat pet portrait drawing – hopefully you can take some tips away that will enhance your drawings.
You may also view my tabby cat commission.